Shop The Look

Saturday 14 December 2013
Tuesday 17 September 2013
Trend Lovage: Window Pane Print
I spotted this beautiful window pane print all over NFW! I think it is such a cool statement print. This oversize check print gives a new bolder look to your average check clothing. I am lusting after this J.W. Anderson sweater HERE....perfection!!
Labels:
2013,
Designer,
Fashion,
Fashion blog,
Fashion blogger,
Fashion Trend,
girl,
JWANDERSON,
LFW,
Love,
Lust,
NFW,
OOTD,
Print,
Window Pane Print
Wednesday 4 September 2013
ASOS AW13: My Picks
Love these tailored shorts, find them HERE!
This chunky knit is a must for those colder days, find it HERE!
I love a good boyfriend shirt, this one also has a leather collar. Get it HERE!
A skater skirt is a wardrobe stable, I love this leather look one. Snap it up HERE!
How cute is this jumper, adore it! Buy it HERE!
This dress is a great buy, find it HERE!
A super duffle coat HERE!
Thank you ASOS!!
Labels:
2013,
Asos,
AW13,
Blog,
Blogger,
Blonde,
Coat,
Fashion,
Fashion blog,
Fashion blogger,
Fashion Trend,
girl,
Leather,
Print,
Skirt,
Tartan
September Inspo
Labels:
2013,
AW13,
Blog,
Blogger,
Coat,
Fashion,
Fashion blog,
Fashion blogger,
girl,
Inspiration,
Inspo,
Love,
Lust,
Miranda Kerr,
Olivia Palermo,
Street Style,
Zara
Monday 2 September 2013
Want: Buckle Boots
I am loving these buckle style boots that are on the high street at the mo. A good pair of flat boots are key to any gals wardrobe. Theses have all the comforts of boots with an added coolness. I love the way the would add some edge to an autumn ensemble. I can just see mine paired with some denim skinny jeans and a chunky knit......what do you guys think?! I want these Jeffery Campbell ones ALOT!
Friday 16 August 2013
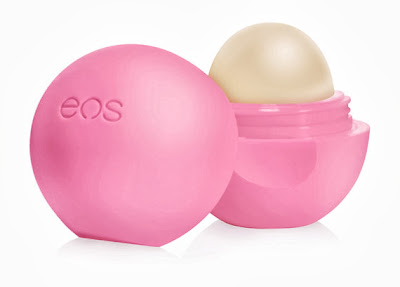
Celebrity: EOS Lipbalm
 |
| Strawberry Sorbet |
Theses beauties come in a few different varieties such as: Strawberry Sorbet, Sweet Mint, Summer Fruit but to name a few. I bought Strawberry Sorbet (which smells amazing) from The Beauty Parlour. They cost nine euro with postage. I love mine, it glides on and does not feel sticky or heavy. I get very dry lips and i can already feel my lips softer! LOVE!!

Thursday 15 August 2013
Results: Make-Up Blog Results
So guys I wanted to try out Ger's amazing makeup tutorial. It was such an easy guide which I loved. It is also a very "m" kinda makeup look. I love eyeliner and a red lip....classic! I also wanted to try out some mac samples I received on a recent trip to my Mac makeup counter. It was the Mac pro longwear foundation and concealer. As I like a glowy look to my skin I always mix Mac strobe cream with my foundation. This foundation and concealer is really nice. I love how it gives great coverage and a lovely base to contour with. I always use my Mac "Give me sun" bronzer, it is the best. Here is my finished look.....thanks again to Ger for the wonderful tutorial. Will you guys be trying it?
| Colour |
| B&W |
 |
| Add caption |
Labels:
bblogger,
Blog,
Blogger,
Blonde,
eyeliner,
Fashion,
girl,
lOREAL,
MAC,
Make Up Forever,
Makeup,
Makeup Artist,
MUA,
red,
Red lipstick,
Rimmel,
Trend
Saturday 10 August 2013
Guest Blogger: Sugar Fix Makeup Step By Step Guide To Red Lip And Winged Liner
My very talented best friend and fellow blogger Ger has kindly done a guest post for all my readers. She is a trained make up artist who runs her own freelance business "Eye Candy Makeup" and she has just started her own blog sugarfixmakeup.blogspot.ie. Go check out her page, she has loads of look, tips and reviews! I love a good strong lip and flicked liner, it is my go to look. Here Ger gives you a guide on how to achieve this look yourself. Enjoy :)
 |
Ger rocking the finished lookStep One: Foundation |
Moisturize and prime the skin first. I used Bobbi Brown Hydrating face cream and Garniers Perect Blur as my primer. I then applied a light layer of Bobbi Brown Long-Wear Even Finish in the shade 2.5.
I then began contouring my face. To darken the skin I used like a pan-stick formula from UNE in the darkest shade I could find. Its called a BB Cream Bronzer in the shade S05 and I got it in boots.
To lighten I used a contour cream from MAC pro store that I don't think are available anymore. Maybe use MAC studio sculpt cream in a few shades lighter than your everyday makeup.
I'm sure you have all seen photo's of how to contour. I used a MAC 130 (smaller than your normal foundation brush) to apply the darker colour just below my cheekbones down the sides of my nose to make it appear slimmer and on the outer edge of my forehead. Last just a little under my jaw.
Dont be afraid to put a good bit on, it will all be blended in later. The lighter colour is applied under my eyes, right down to the end of my nose and diagonally to the outer corner of my eye. Fill in this whole area with the light colour. Add another little bit just on your brow bone and a thin line down the center of your nose. Lightly blend the edges so there is no harsh lines on show. Apply dots of Benefit Sun Beam across the tops of your cheeks and lightly pat in with your fingers. Apply a little blush and dust on some translucent powder anywhere that's very shiny like your T zone. (I use LA makeup academy translucent powder)
Labels:
2013,
bblogger,
Blog,
Blogger,
Eye liner,
Fashion,
Fashion Trend,
Girls,
Inglot,
Jessie J,
Lauren Conrad,
Love,
MAC,
Makeup,
MUA,
Red lipstick,
Rimmel
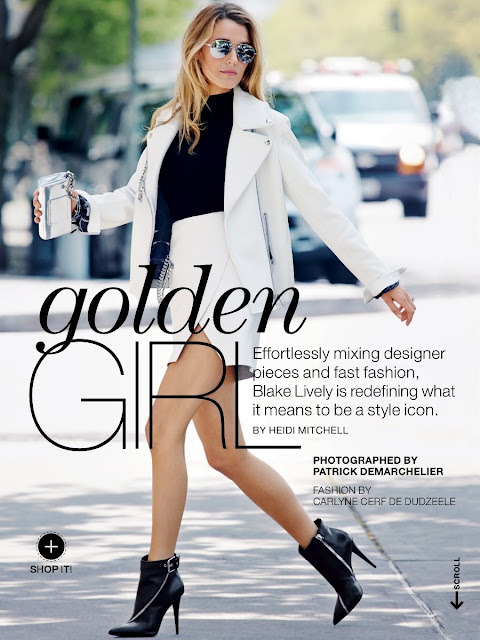
Fashionable Lady: Blake Lively for Lucky Magazine, September 2013
The beautiful wife of Ryan Reynolds and Gossip Girl fashionista, Blake Lively. She is on the cover of Lucky Magazine and plenty more inside. What I love about these pics is how inspired I was by them. She looks amazing!
Labels:
2013,
Accessories,
AW13,
Blake Lively,
Cover,
Fashion,
Fashion blog,
Fashion blogger,
Fashion Trend,
H and M,
Lucky,
Magazine,
Topshop,
Trend,
Trends,
Zara
Subscribe to:
Posts (Atom)


